

Saturation is a gentle, level-dependent distortion. It adds harmonics to a signal and softly rounds off its peaks, which makes a bass line audible on a phone speaker and helps a drum bus sound like one kit instead of separate mics. This explainer covers what the curve does, why some saturators add even harmonics and others add odd ones, where aliasing comes from, and how to set up each technique with free plugins on Windows, macOS and Linux.
Key takeaways
- Saturation, distortion and clipping are one family. What separates them is how hard you drive the signal and how soft the curve’s knee is.
- The shape of the curve decides which harmonics you get: symmetric curves make odd harmonics, and asymmetry brings in even ones.
- Saturation sounds “better” partly because it is louder, so match levels before you judge it.
- Digital saturators can alias. Oversampling or anti-derivative anti-aliasing reduces that.
- Free tools cover almost every job. Klanghelm IVGI, CHOW Tape Model and Airwindows ToTape9 can stand in for most paid saturators.
Fact-checked
We checked these key facts against the sources named, on November 09, 2026:
- Read the peaks: 300/500/700 Hz only means symmetric; 200/400 Hz too means asymmetric (source: till.com)
- A 50 Hz bass note has harmonics at 100, 150, 200 and 250 Hz, and your ear infers the missing fundamental from that series (source: en.wikipedia.org)
- Whether a saturator adds even harmonics (2nd, 4th, 6th) or only odd ones (3rd, 5th, 7th) depends on the symmetry of its curve (source: mural.maynoothuniversity.ie)
- According to Chowdhury DSP’s GitHub, the free CHOW Tape Model was originally based on a consumer Sony TC-260 reel-to-reel deck, not a high-end studio machine (source: audiotechnology.com)
- Airwindows ToTape9, released free under the MIT licence by Chris Johnson and the successor to ToTape8, is built for gentle tape behaviour with brightness compression (source: github.com)
What is saturation in audio? (quick answer)
Saturation is non-linear gain. Quiet parts of the signal pass almost unchanged, and louder parts get progressively less gain. That bending of the waveform adds new frequencies (harmonics) above the original notes and softly compresses the peaks. Used lightly, you hear it as density, warmth or “glue” rather than as obvious distortion.
The name comes from analog hardware. Magnetic tape, vacuum tubes, transformers and transistors all have a limit past which they cannot respond in proportion to the input. Near that limit their response curves, and engineers learned to use that curve on purpose. Every modern saturation plugin either models one of those devices or applies a mathematical curve that behaves in a similar way.
If you were looking for colour saturation in photos, oxygen saturation (SpO2) in medicine, or a saturated solution in chemistry, this page will not help you. Everything below is about audio.
What saturation actually does to your signal
A saturator is a transfer curve: a rule that maps each input sample value to an output value. Two things follow from the curve bending near the top. Peaks get squashed, which is compression. The waveform changes shape, which adds harmonics. Once that is clear, the rest of the subject is easier to follow.
The transfer curve: linear vs. soft vs. hard
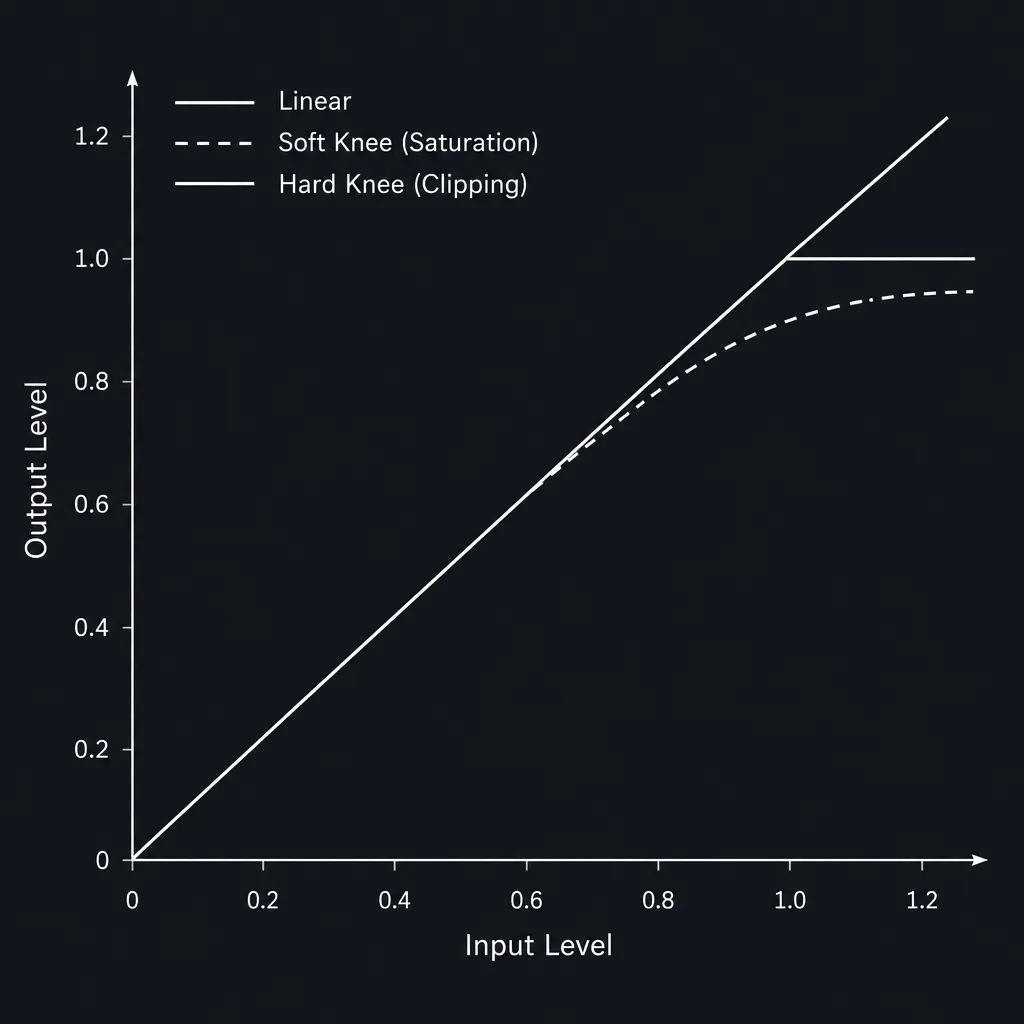
Picture a graph with input level on the horizontal axis and output level on the vertical axis.
- Linear (no saturation): a straight diagonal line. Output equals input times a fixed gain, so the waveform shape never changes and no new frequencies appear.
- Soft knee (saturation): the line stays straight near the centre, then curves gradually and flattens toward a ceiling. The classic mathematical version is the hyperbolic tangent, so you will often see “tanh waveshaper” in DSP writing. Arctangent and cubic curves behave in a similar way.
- Hard knee (clipping): the line stays perfectly straight until a threshold, then goes flat. Anything above the ceiling is chopped off.
All three are the same kind of device. The difference is how abruptly the curve leaves the straight line. A gentle bend adds a small number of fairly quiet harmonics. A sharp corner adds a long series of strong ones, and that is why hard clipping sounds buzzy and soft saturation sounds round.
Why saturation compresses
A soft curve has a slope of about 1 near zero and a slope close to 0 near its ceiling, so louder samples get less gain than quieter ones. That is the definition of compression, even though there is no attack, release or detector involved. You can work it out on a plain tanh curve:
| Input peak (linear) | Output, tanh(x) | Gain change |
|---|---|---|
| 0.25 | 0.245 | −0.18 dB |
| 0.5 | 0.462 | −0.68 dB |
| 1.0 | 0.762 | −2.37 dB |
| 2.0 | 0.964 | −6.34 dB |
An input that swings 12 dB (0.25 to 1.0) comes out with about 9.9 dB of swing. The quiet material is almost untouched and the loudest peaks lose more than 2 dB. Unlike a compressor, a saturator does this on every sample, so it rounds individual transients instead of riding the envelope. That is why moderate drive on a snare reduces its peak-to-average ratio, and why a mix that has been saturated can be turned up further before it hits a limiter.
Why saturation adds harmonics
A pure sine wave bent by a curve is no longer a pure sine. Its tops get flatter, and any periodic waveform that is not a sine is made of a fundamental plus harmonics at whole-number multiples of it. The maths is simple. Square a sine and you get a term at twice the frequency, the 2nd harmonic. Cube it and you get a term at three times the frequency, the 3rd harmonic. A real saturator curve is a blend of many such powers, so it produces a series of harmonics that get quieter as they go up, at least in a well-behaved design.
That is also why heavy drive brightens a sound. The new energy sits above the original notes.
Even vs. odd harmonics: what’s going on
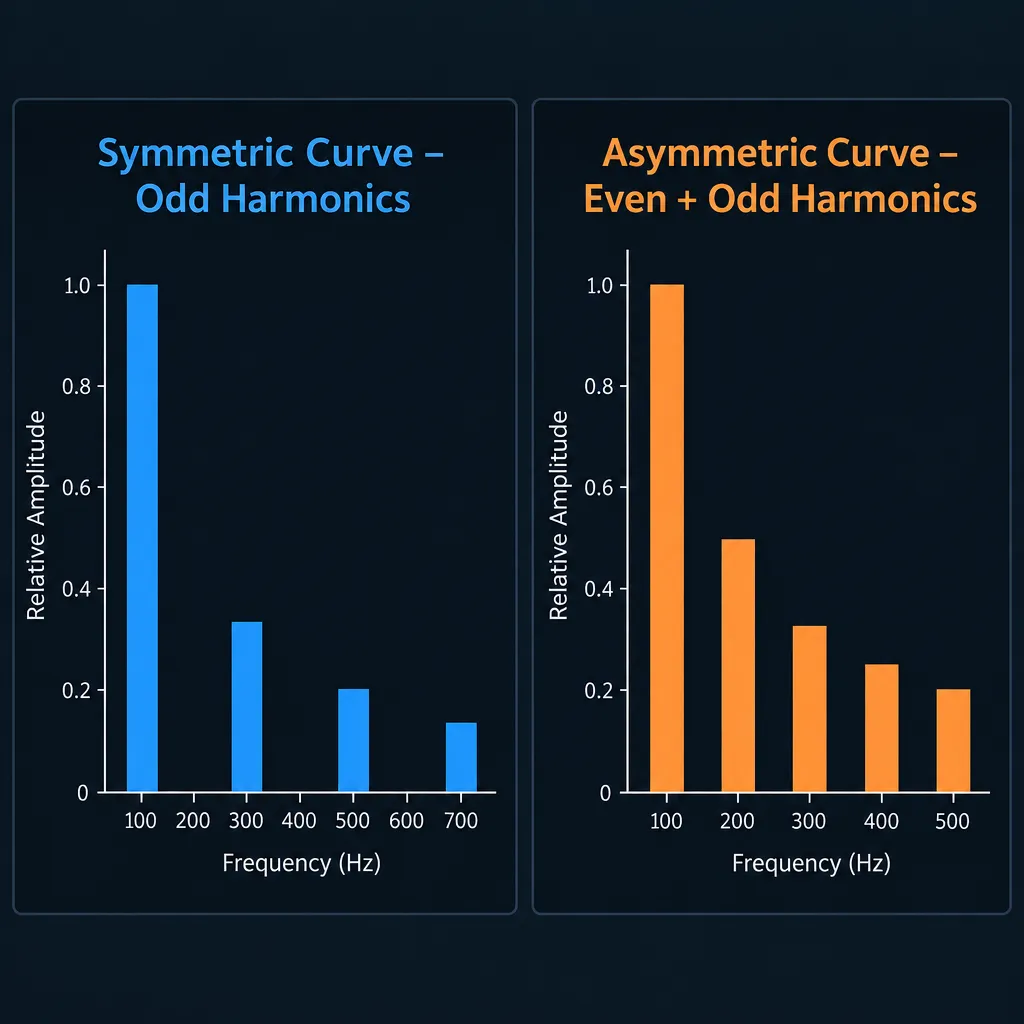
Whether a saturator adds even harmonics (2nd, 4th, 6th) or only odd ones (3rd, 5th, 7th) depends on the symmetry of its curve. Brand, tube type and “vibe” do not decide it. This section gives you the frequencies and a test you can run.
The 100 Hz example
Take a 100 Hz sine as the fundamental. Its harmonics fall at whole-number multiples, and each one lands on a musical interval above the root:
| Harmonic | Frequency | Even/odd | Musical interval above 100 Hz | Produced by |
|---|---|---|---|---|
| 1st (fundamental) | 100 Hz | – | Root | The original signal |
| 2nd | 200 Hz | Even | One octave | Asymmetric curves only |
| 3rd | 300 Hz | Odd | Octave + perfect fifth | Symmetric and asymmetric curves |
| 4th | 400 Hz | Even | Two octaves | Asymmetric curves only |
| 5th | 500 Hz | Odd | Two octaves + major third (slightly flat) | Symmetric and asymmetric curves |
| 6th | 600 Hz | Even | Two octaves + fifth | Asymmetric curves only |
| 7th | 700 Hz | Odd | Two octaves + flat minor seventh | Symmetric and asymmetric curves |
| 8th | 800 Hz | Even | Three octaves | Asymmetric curves only |
| 9th | 900 Hz | Odd | Three octaves + major second | Symmetric and asymmetric curves |
The low even harmonics are all octaves or fifths of the note, so they blend in and mostly thicken the sound. The 7th and 9th harmonics sit on intervals that are out of tune or dissonant against Western scales. A long, loud series of high odd harmonics is the reason hard clipping sounds harsh.
Symmetry decides the harmonic order
A curve that treats the positive and negative halves of the wave identically, such as tanh, gives an output with half-wave symmetry, and that kind of waveform contains only odd harmonics. Add any asymmetry, so one half of the wave bends earlier or harder than the other, and even harmonics appear. The asymmetry can come from the curve itself or from a DC bias added to the input.
Did you know?
The Elementary Audio DSP tutorial on wave shaping points out that a perfectly symmetric curve like tanh produces mainly odd harmonics. For a zero-mean sine passed through a symmetric curve, the generated harmonics are odd; a DC offset or other asymmetry in the input signal can still bring in even harmonics, even when the curve itself is symmetric.
This explains the familiar hardware rules of thumb. A single-ended triode stage clips one half of the wave differently from the other, so it is known for a strong 2nd harmonic. Push-pull amplifier designs cancel much of the even content, so odd harmonics dominate. Tape is close to symmetric, so its added harmonics are mostly odd. The Empirical Labs Distressor takes this idea further: its distortion modes are designed to add 2nd or 3rd harmonics as a selectable choice.
The free Klanghelm IVGI puts symmetry on a knob. Its manual describes ASYM MIX at 0 as symmetric saturation with a strongly compressing character, and at 10 as asymmetric saturation with a more transparent sound. You can hear the harmonic balance change as you turn it.
Test any saturator yourself in 2 minutes
You do not have to trust a plugin’s marketing to know what it adds.
Quick steps: measure a saturator's harmonics
- Put a 100 Hz sine generator on a track at about −18 dBFS.
- Insert the saturator, then a free spectrum analyzer after it.
- Raise drive until harmonics appear above the fundamental.
- Read the peaks: 300/500/700 Hz only means symmetric; 200/400 Hz too means asymmetric.
- Raise the input 6 dB and note how the harmonic levels grow.
Step 5 matters because most saturators are level-dependent. The same plugin can sound clean at −24 dBFS and gritty at −6 dBFS.
Blog claims about which order sounds “warm” contradict each other. The common teaching says even harmonics are warm and odd ones are edgy, while iZotope’s saturation explainer describes odd harmonics as adding warmth and even ones as adding edge. Both claims leave out level, the number of harmonics and the source material. A strong 3rd harmonic on a sub bass can sound warm, and a strong 2nd harmonic on a bright vocal can sound honky. The analyzer tells you what is there. Your ears, on a level-matched comparison, tell you whether it works.
Saturation vs. distortion vs. clipping vs. exciters
A common question on forums is whether saturation is “just distortion with a nicer name”. It largely is. Saturation, overdrive, distortion and clipping all use a non-linear curve. They differ in how far you push into the curve, how soft its knee is, and whether the processing is limited to one frequency band.
| Process | Curve | Audible result | Typical use |
|---|---|---|---|
| Saturation | Soft knee, gentle drive | Density, warmth, rounded peaks, low-order harmonics | Buses, bass, vocals, master |
| Overdrive/distortion | Soft or medium knee, heavy drive | Obvious grit, sustain, strong harmonic series | Guitar, synths, creative effects |
| Clipping | Hard knee at a ceiling | Transparent at low amounts, buzzy when pushed | Peak control on drums, loudness on the master |
| Exciter | Saturation applied only to a filtered band, blended in | Added brightness or presence without full-band grit | Dull vocals, cymbals, mastering |
An exciter is a band-limited saturator. It high-passes a copy of the signal, saturates only that copy, and mixes it back under the original. That is why exciters brighten a sound without making the low mids muddy, and why you can build one yourself, as covered further down.
Types of saturation: tape, tube, transformer, transistor, digital
Each type of analog saturation has its own harmonic profile, compression feel and frequency side effects, and there is a free plugin that models each one. Read the table as general tendencies. Individual devices and plugins vary a lot.
| Type | Dominant harmonics | Compression feel | Frequency side effects | Free plugin to try |
|---|---|---|---|---|
| Tape | Mostly odd, low order | Soft, smooth, rounds transients | Head bump in the lows, high-frequency loss and compression | CHOW Tape Model, Airwindows ToTape9 |
| Tube (single-ended) | Strong 2nd, plus odd | Gentle, “blooming” | Often flat, sometimes softened highs | Klanghelm IVGI (asymmetric settings) |
| Transformer/console | Mostly odd, rising in the lows | Subtle | Low-frequency saturation, slight weight | IVGI with RESPONSE set to LF+ |
| Transistor/FET/op-amp | Odd, sharper knee | Faster, grittier | Brighter edge | ChowCentaur, PeakEater (cubic or algebraic curve) |
| Digital waveshaper/soft clipper | Whatever the curve dictates | From transparent to brutal | None unless aliasing | PeakEater, LSP Clipper |
Tape (bias, head bump, HF compression)
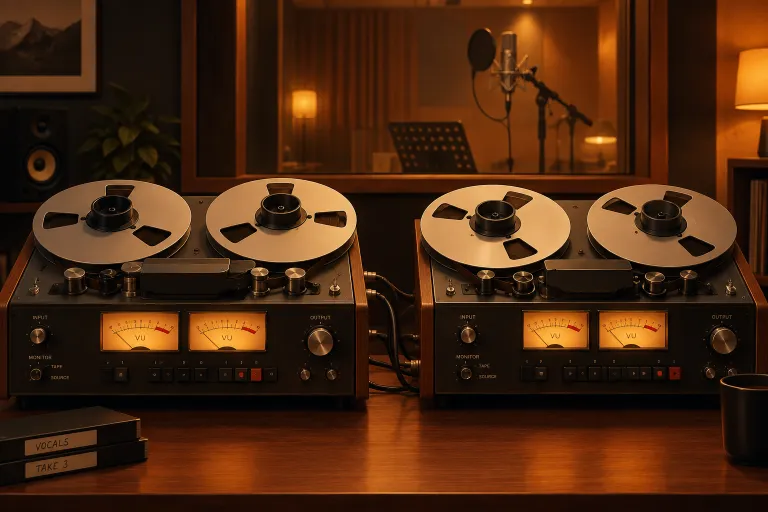
Tape saturation is the gentlest and most popular kind. Magnetic tape has a hysteresis curve, and engineers add a high-frequency bias signal to make recording linear at normal levels. Push harder and the tape compresses smoothly, and high frequencies saturate first. That high-frequency compression is why loud cymbals on tape sound softer rather than harsh. Playback heads also produce a “head bump”, a low-frequency rise whose position shifts with tape speed. Slower speeds lose more top end.
CHOW Tape Model from Chowdhury DSP is a free, open-source physical model of reel-to-reel tape. KVR Audio lists it at version 2.11.4, and it ships as VST, VST3, AU, AAX, CLAP, LV2 and standalone, plus AUv3 on iOS. It exposes the physics directly: drive, saturation and bias in the hysteresis section, then tape speed and head spacing in the loss section, then wow and flutter.
Did you know?
According to Chowdhury DSP’s GitHub, the free CHOW Tape Model was originally based on a consumer Sony TC-260 reel-to-reel deck, not a high-end studio machine.
Tube
Tube saturation is mostly a story about asymmetry. A single-ended triode bends the two halves of the wave differently, so it adds a prominent 2nd harmonic, which is why it is described as thick and musical at low drive. Pushed harder, a tube stage adds odd harmonics too and starts to “bloom”, meaning sustain rises as transients are pulled down. In IVGI, moving ASYM MIX toward 10 gives you that asymmetric behaviour.
Transformer and console
Transformer saturation depends on frequency. Iron cores saturate more easily at low frequencies, so a hot bass note gains harmonics while the highs pass through cleanly. Large-format console channels add a small amount of this kind of colour on every track, and “console emulation” plugins copy it. Airwindows has a long-running Console series built on this idea. IVGI’s RESPONSE control is close to the transformer behaviour: the manual describes its LF+ setting as focusing the saturation on low frequencies and gently cutting highs, while N processes the full band evenly.
Transistor/FET
Transistor and op-amp circuits clip with a firmer knee than tubes or tape, and they are often close to symmetric, so the sound is odd-heavy and edgier. Guitar pedals sit in this category. Chowdhury DSP’s free ChowCentaur models the Klon Centaur overdrive pedal and runs as VST, AU, LV2 and standalone on desktop, plus iOS. Its sister project BYOD (Build Your Own Distortion) lets you chain modular distortion blocks if you want to experiment.
Digital waveshapers and soft clippers
A digital waveshaper applies a mathematical curve with no circuit model behind it. That makes it predictable and CPU-light, and it lets you pick the curve directly. PeakEater, a free open-source plugin in VST3, AU, LV2 and CLAP, offers six curves: hard, quintic, cubic, tangent, algebraic and arctangent. Hard is the harshest and least transparent, while arctangent is a softer, warmer curve. It also shows how many decibels it clipped, which is handy for gain staging.
Aliasing: the hidden cost of digital saturation
Aliasing is the main quality problem with digital saturators. Harmonics produced above the Nyquist frequency (half the sample rate) cannot exist in the digital signal, so they fold back into the audible band at frequencies that are not harmonically related to the note. You hear that as grainy, metallic or “digital” harshness. The fixes are oversampling or anti-derivative anti-aliasing (ADAA).
How foldback works, with numbers
At a 48 kHz session rate, Nyquist is 24 kHz. Feed a 10 kHz sine into a symmetric saturator and it produces odd harmonics:
- 3rd harmonic: 30 kHz, which folds to 48 − 30 = 18 kHz
- 5th harmonic: 50 kHz, which folds to 50 − 48 = 2 kHz
- 7th harmonic: 70 kHz, which folds to 70 − 48 = 22 kHz
- 9th harmonic: 90 kHz, which folds to 96 − 90 = 6 kHz
None of those landing points is a multiple of 10 kHz, so they do not blend with the note. A 2 kHz tone appearing under a 10 kHz hi-hat partial is the kind of artefact that makes heavily saturated digital mixes sound brittle. The harder the knee and the higher the drive, the more strong high harmonics there are to fold back. That is why hard clippers alias far worse than gentle tape models.
Oversampling vs. ADAA
Oversampling runs the saturator at a multiple of the session rate (2x, 4x, up to 32x in PeakEater), filters out everything above the original Nyquist, then converts back down. Fewer harmonics are left to fold over, but CPU load rises, latency is added, and linear-phase filters can introduce pre-ringing before transients.
Anti-derivative anti-aliasing takes a different route. It processes the integral of the curve instead of the curve itself, which smooths the corners that create the worst high harmonics. Newfangled Audio, writing about its Saturate 1.10 update, reports that ADAA performs comparably to heavy oversampling with much less processing. Airwindows takes a third route: Chris Johnson’s ToTape9 is designed to avoid oversampling and deals with intersample clipping without upsampling or downsampling.
Producer tip
To check whether a plugin aliases, run a 10 to 15 kHz sine through it with the drive up, and look in a free analyzer for lines that do not sit at multiples of the input, especially any below the fundamental. If you see them, turn on oversampling or pick a gentler curve.
When to turn oversampling off
Turn oversampling off while tracking, since the extra latency is noticeable when you monitor through the plugin. Whether to leave it off when adding a little drive to low-frequency sources such as bass or kick is a production choice; how many of their harmonics reach Nyquist depends on the source pitch, the drive and the sample rate. Turn it on for bright sources, heavy drive, and the final mixdown or bounce. Some plugins let you set separate real-time and render oversampling for exactly this reason.
How to use saturation in a mix (free-plugin recipes)
The starting settings below follow common practice and the plugins’ own documentation. Treat them as places to start, not as fixed values. The same method applies to every source: set the input level, add drive until you hear a change, bring the output back to matched loudness, then judge.
Bass: audible on phone speakers
Saturation makes bass audible on small speakers because harmonics carry the note into a range those speakers can reproduce. Phone and laptop speakers reproduce very little low bass. A 50 Hz bass note has harmonics at 100, 150, 200 and 250 Hz, and your ear infers the missing fundamental from that series.
- Insert Klanghelm IVGI on the bass. Set the input trim so the meter sits around 0 VU. IVGI is calibrated so that 0 VU equals −18 dBFS.
- Set RESPONSE to N for full-band saturation, or LF+ if you want the low end to carry most of the colour.
- Raise DRIVE until the bass starts to read clearly on small speakers or earbuds.
- Pull OUTPUT down until bypassing makes no change in loudness.
- Add an EQ after the saturator. High-pass any sub buildup below the fundamental, and low-pass any fizz above about 5 kHz that the bass never needed.
For a sub bass that should stay clean, run the saturator on a parallel copy, high-pass that copy around 120 Hz, and blend it in under the clean sub. You get harmonics for small speakers without muddying the true low end.
Drum bus glue
On a drum bus, saturation rounds the transients of all the drums together. Because every drum is pushed into the same curve, they sound more like one kit, which a compressor does differently through its envelope.
- Insert CHOW Tape Model on the drum bus.
- Start with low drive and moderate saturation. Raise the input until the snare peaks visibly soften on the meter.
- Lower tape speed if the cymbals sound too bright. Raise it to keep the top end open.
- Use the dry/wet control to blend some of the clean signal back in.
- Match output level and compare.
Producer tip
On drums, use the mix knob or a parallel bus instead of 100% wet. You add density from the saturated copy and keep the attack of the dry kit, which stops the snare from sounding flattened.
Vocals and parallel saturation
On vocals, saturation adds density and helps a voice sit forward without large EQ boosts. The risk is harshness in the sibilant range, so parallel processing and band-limiting work best.
- Create an aux or send bus from the vocal.
- On the bus, put a high-pass EQ at roughly 800 Hz to 1 kHz, then a saturator: IVGI with ASYM MIX toward the asymmetric end, or Softube Saturation Knob in Keep Low mode, which protects the low end while saturating the upper range.
- Drive the bus clearly, even to audible grit, and then blend it in quietly under the dry vocal.
- If sibilance gets worse, place a de-esser before the saturator, not after it.
This is a homemade exciter: saturation applied only above a crossover point and mixed back in. It also pairs well with automatic double tracking, since the saturated layer and the doubled layer both add width and density without raising the lead’s peak level much.
Master bus: subtle tape
On the master bus, use saturation sparingly. Its job there is to round off a decibel or two of peaks and add a slight sense of cohesion before the limiter, not to change the tone.
- Insert Airwindows ToTape9 or CHOW Tape Model before your limiter.
- Keep the drive low enough that gain reduction on loud peaks is around 1 dB on the plugin’s meter, or as little as you can hear.
- Level-match carefully, since at this stage even 0.5 dB louder will sound “better”.
- Check that the limiter afterwards is doing less work than before. If it is, the saturator is helping your loudness.
- Watch true-peak levels at the end of the chain, because saturation followed by limiting can still create inter-sample overs.
If you work on a free mastering chain, T-RackS and its free version include tape and tube modules that do a similar job, though they are closed source and Windows/macOS only.
Lo-fi and creative destruction
For obvious effects, ignore the subtlety rules: high drive, hard curves, low tape speed, and heavy wow and flutter in CHOW Tape Model. PeakEater’s hard curve with oversampling switched off will alias on purpose, which suits glitchy hats and bit-crushed textures. Filter before the saturator to choose which part of the spectrum breaks up, and filter after it to shape the result.
Gain staging and the loudness trap
Gain staging decides how a saturator sounds, because the amount of distortion depends on the level going in. The loudness trap decides whether you judge it fairly. People on forums often say saturation plugins behave differently depending on how hard you drive them. That is by design, and it is why you need a repeatable procedure.
Drive in, trim out
Most analog-modelled plugins expect a nominal level. IVGI is calibrated so that 0 VU equals −18 dBFS, and its manual tells you to set input trim to reach about 0 VU, use DRIVE for the amount of saturation, and use OUTPUT to make up lost level. If a track peaks near 0 dBFS when it reaches the plugin, it is already far into the curve before you touch the drive knob. Put a gain or trim plugin before the saturator and bring the input to its sweet spot first.
Level-matched A/B
A sound that is 1 dB louder usually seems fuller and clearer to listeners. Most saturators raise perceived loudness, either directly or by increasing average level through peak compression, so an un-matched A/B is biased toward the saturated version.
Quick steps: gain-match a saturator
- Loop 8 bars and watch a loudness meter (LUFS short-term).
- Bypass the saturator and note the reading.
- Enable it and set the drive.
- Lower the output until the reading matches within 0.5 dB.
- Toggle bypass with your eyes closed or a blind-test plugin.
Producer tip
Turn the output down by as much as you pushed the drive, then compare at equal loudness. If you cannot pick out the saturated version blind, back off the drive or remove the plugin.
EQ after the saturator
Saturation adds energy in two places you rarely want. Asymmetric curves create a DC offset and sub-harmonic buildup, and heavy drive adds high fizz. A high-pass or low-shelf cut after the saturator cleans the low end, and a gentle low-pass, or a high shelf cut a few decibels above 10 kHz, tames the fizz. An EQ before the saturator does a different job: boost a band going in and that band saturates first.
How many saturators is too many?
One common rule says each stage should add only a hint, and that works because harmonic distortion stacks. Five tracks with light tape, into a bus with light tape, into a master with light tape, can build into the dense, flat, slightly fuzzy sound people describe as “overcooked”. A practical limit: saturate the sources that need character (bass, drums, vocals, a dull synth), use one bus-level saturator per group, and one gentle stage on the master. Then bypass the whole chain once at matched level. If the dry mix sounds clearer and only slightly quieter, reduce the drive across all stages.
Watch out
Oversampling and linear-phase filtering in a saturator add latency. Mostly this is compensated automatically, but it can throw off live monitoring and parallel routing in some DAWs. Check plugin delay compensation if parallel blends start to sound phasey.
Best free and open-source saturation plugins (2026)
In 2026 the best free saturation plugin for most people is Klanghelm IVGI, and Bedroom Producers Blog’s current roundup rates it the most versatile free option, from vocals to the mix bus. For tape, CHOW Tape Model and Airwindows ToTape9 compete closely. Linux users should look at Airwindows Consolidated, LSP and CHOW. These recommendations weigh sound quality and flexibility first, then licence openness, platform and format coverage, and finally friction such as accounts or iLok. They are based on developer documentation and published reviews.
| Plugin | Type | Licence | Formats | Linux | Account/iLok needed | Anti-aliasing | Best on |
|---|---|---|---|---|---|---|---|
| Klanghelm IVGI 2.5.0 | Analog-style saturation/distortion | Freeware (closed) | VST, VST3, AU, AAX | No | No (no sign-up or activation) | No user control | Anything; mix bus, bass, vocals |
| CHOW Tape Model 2.11.4 | Physical tape model | Open source (GPL-3.0) | VST, VST3, AU, AAX, CLAP, LV2, standalone, AUv3 | Yes | No | Selectable oversampling | Drum bus, master, lo-fi |
| Airwindows ToTape9 | Tape emulation | Open source (MIT) | AU, VST2; VST3, CLAP, LV2 via Consolidated | Yes | No | Designed without oversampling | Master bus, subtle tape on groups |
| Softube Saturation Knob | One-knob saturation | Freeware (closed) | VST, VST3, AU, AAX | No | Free Softube and iLok accounts, no dongle | No user control | Quick colour on bass and vocals |
| PeakEater | Waveshaper/clipper | Open source | VST3, AU, LV2, CLAP | Yes | No | Off to 32x oversampling | Drums, peak control, creative |
| LSP Clipper | Clipper (mono/stereo, plus multiband version) | Open source | LADSPA, LV2, LinuxVST and others | Yes | No | Per LSP docs | Linux mixing and mastering |
Best overall free: Klanghelm IVGI
IVGI is free with no sign-up or activation, which already puts it ahead of several free competitors. It goes from barely audible density up to real distortion, and its two standout controls are ASYM MIX, which sets symmetry and therefore the harmonic balance, and RESPONSE, which sets how frequency-dependent the saturation is. IVGI 2 uses a new plugin ID, so it can run alongside the original IVGI in older sessions. Its main limit is platform support: Windows and macOS only. It covers much of what paid tools such as iZotope Neutron’s exciter module or iZotope Plasma do for single-band saturation.
Best free tape: CHOW Tape Model vs. Airwindows ToTape9
Choose CHOW Tape Model if you want visible controls and big effects. Choose ToTape9 if you want a subtle, CPU-light tape character on the master. CHOW exposes bias, speed, spacing, wow and flutter, so it can go from transparent to deliberately broken cassette sound. Airwindows ToTape9, released free under the MIT licence by Chris Johnson and the successor to ToTape8, is built for gentle tape behaviour with brightness compression. ToTape8 is still available too, with gain staging, bias, “Dubly” and a built-in safety clipper. Both ToTape versions use Airwindows’ plain, slider-only interface, which some people find limiting.
As for which Airwindows plugins are worth using, the catalogue runs to hundreds of effects. Most users start with ToTape9 for tape, Console-series plugins for summing colour, and simple drive plugins such as Density, Spiral and PurestDrive. Airwindows Consolidated packages the whole catalogue in one CLAP, AU, VST3 and LV2 plugin with a menu, which makes it much easier to browse.
Best on Linux: LSP, GxSaturator, Airwindows Consolidated LV2
Linux has strong native options. Most competing guides do not mention them. LSP (Linux Studio Plugins) is an open-source suite supporting LADSPA, LV2 and LinuxVST, and it includes Clipper and Multiband Clipper plugins alongside its EQs and dynamics. GxSaturator is a small LV2 saturation plugin licensed GPL 3+, and most distributions package it. Airwindows Consolidated runs as LV2 or CLAP, and CHOW Tape Model has native Linux builds. If you are still choosing a distribution, the comparison of Ubuntu or Linux Mint for music production covers the setup side. All of these load directly into Ardour, Bitwig Studio and Reaper on Linux.
Simplest one-knob: Softube Saturation Knob (account caveat)
Saturation Knob is quick to use: one drive knob and a three-way switch for Keep High, Keep Low and Neutral, which decide which part of the spectrum is protected from saturation. A 2021 update fixed its earlier gain-staging problems. The catch is the install. Softube delivers it free through Softube Central, and you need both a free Softube account and a free iLok account, although no physical dongle. If you would rather avoid accounts, IVGI does everything Saturation Knob does and more.
Waveshaper/clipper: PeakEater
PeakEater is the free, open-source choice when you want to pick the curve yourself. Its six curves let you hear the knee-shape difference described earlier. Its oversampling runs from off to 32x, though the developer warns that high settings are CPU-heavy. One review notes that with oversampling on, peaks can slightly exceed the ceiling, so if it sits last on a master, place a true-peak limiter after it.
Where free tools fall short
The real gap is multiband and spectral saturation. Paid tools such as FabFilter Saturn 2 split the signal into bands with a different saturation style and drive in each, plus modulation, and no free plugin matches that in a single window. You can build a workaround: split the track with a crossover (LSP has crossover and multiband tools, and most DAWs can route bands to separate buses), put a different free saturator on each band, then sum. It takes more effort than Saturn, but it does the same job.
DIY saturation with stock DAW tools
You can make usable saturation in any digital audio workstation without a dedicated plugin. All it takes is drive into a soft clipper or waveshaper, an EQ after it, and a parallel bus for control.
The generic recipe
- Put a gain plugin on a send bus and raise it 6 to 12 dB.
- Follow it with any soft-clip, overdrive or waveshaper effect your DAW includes.
- Add a trim to bring the level back down.
- Add an EQ: high-pass to remove low-end buildup, low-pass to remove fizz.
- Blend the bus under the dry track to taste.
That chain contains the drive, curve, output trim, post-EQ and mix of a commercial saturator.
Reaper (JSFX)
Reaper ships with JSFX effects you can edit, and writing your own saturator takes a few lines. This arctangent waveshaper has drive and a bias control. Raising the bias makes the curve asymmetric, so you can hear even harmonics appear on the 100 Hz test tone from earlier:
desc: Simple atan saturator with asymmetry
slider1:6<0,24,0.1>Drive (dB)
slider2:0<0,0.5,0.01>Bias (asymmetry)
@slider
g = 10^(slider1/20);
b = slider2;
@sample
spl0 = (atan(g*(spl0+b)) - atan(g*b)) / g;
spl1 = (atan(g*(spl1+b)) - atan(g*b)) / g;
Subtracting atan(g*b) removes the static offset the bias would otherwise add. Dividing by g keeps quiet signals at roughly unity gain, so the drive slider mainly changes how hard the peaks are bent. The code has no anti-aliasing, so keep the drive moderate on bright material.
Audacity, LMMS and Ardour
Audacity’s built-in Distortion effect includes soft clipping, overdrive and two modes named for their harmonics, “Cubic Curve (odd harmonics)” and “Even Harmonics”. That makes it a useful tool for learning the odd/even difference on a test tone, as covered in the guide to what the Audacity audio editor can do. LMMS includes a Waveshaper effect where you draw the transfer curve by hand, a direct way to see how knee shape changes the sound. Ardour has no dedicated stock saturator, but it loads LV2 natively, so LSP, GxSaturator, Airwindows Consolidated and CHOW Tape Model can all be used in Ardour.
FAQ
What is saturation in music?
Saturation is gentle, level-dependent distortion. It adds harmonics above each note and softly compresses peaks. It started with analog tape, tubes and transformers, and plugins now emulate it. In a mix you hear it as density, warmth or cohesion rather than as obvious grit.
What is the difference between saturation and distortion?
There is a difference of degree and curve shape, not of kind. Saturation uses a soft knee and low drive, so it adds a few low-order harmonics. Distortion pushes harder or uses a sharper knee, which gives a longer, louder harmonic series that you clearly hear as an effect.
Does saturation make a mix louder?
Yes, in two ways. Many saturators raise output level directly, and their soft compression lowers the peak-to-average ratio, so the mix can be turned up further before limiting. That is also why you must level-match before deciding whether it sounds better.
Should I put saturation before or after compression?
Both orders work, with different results. Saturation before a compressor rounds the peaks, so the compressor reacts more gently. Saturation after a compressor gets a more even level, so the distortion stays consistent. On vocals, a common chain is compressor, then saturator, then de-esser, though you can move the de-esser before the saturator if sibilance gets harsh.
Should I use saturation on the master bus?
Use it lightly or not at all. A tape model doing about a decibel of peak rounding before the limiter can let the limiter work less hard. More than that changes the tone of everything at once, which you can usually do better on individual tracks or buses.
What is tape saturation?
Tape saturation is the soft compression and harmonic distortion that happens when magnetic tape is recorded hot. It also brings a low-frequency head bump, high-frequency loss and slight wow and flutter. CHOW Tape Model and Airwindows ToTape9 are free, open-source emulations.
Even vs. odd harmonics: which sounds warmer?
Neither is always warmer. Low even harmonics are octaves and fifths, so they thicken without clashing. High odd harmonics such as the 7th and 9th clash with the note and sound edgy. Published sources disagree, so run a level-matched test on your own material.
What is the best free saturation plugin?
Klanghelm IVGI is the best all-rounder: free, no activation, and flexible enough for vocals, bass and the mix bus. For tape character choose CHOW Tape Model or Airwindows ToTape9. On Linux, use Airwindows Consolidated, CHOW Tape Model, LSP or GxSaturator.
Do I need oversampling on a saturation plugin?
You need it for bright sources and heavy drive, and usually not for gentle saturation on bass. Oversampling reduces aliasing but costs CPU and adds latency, and some filters add pre-ringing. A sensible default is off while tracking and on for the mixdown.
How do I add saturation without a plugin?
Use your DAW’s stock tools. Raise the gain on a send bus, run it into any soft clipper or overdrive effect, trim the level back down, EQ out the sub and fizz, and blend it under the dry track. In Reaper, a five-line JSFX script makes a working saturator.
Where to start
Load a 100 Hz sine and a free analyzer, put IVGI on it, and turn ASYM MIX from 0 to 10 while you watch the 200 Hz and 300 Hz peaks change. You will learn more about how saturation behaves in those two minutes than from most marketing pages. Then move the same plugin onto your bass, match the levels, and play the result on your phone speaker.
Keep reading
Free music tools
Editorial notes
- Fact-checked by Vivian Osei against the sources listed below before publication.
- Published
Sources (8)
- CHOW Tape Model by Chowdhury DSP – KVR Audio (kvraudio.com)
- AnalogTapeModel (CHOW Tape Model) – GitHub (github.com)
- Chowdhury DSP – GitHub (github.com)
- Klanghelm IVGI (klanghelm.com)
- IVGI2 manual – Klanghelm (Klanghelm.com)
- Softube Saturation Knob free update – Bedroom Producers Blog (bedroomproducersblog.com)
- Saturation Knob – Softube (softube.com)
- ToTape8 – Airwindows (airwindows.com)